Showing posts with label cameo. Show all posts

Tuesday, July 24, 2018

Floral Birthday Wishes

Time for a summery fresh floral birthday set!


This delightful teacup is by SVG Cuts. I've made several of them over the years. They make wonderful little gift or treat holders. (HERE is another example)


The flowers are by Petaloo. I had bought a pack of the white ones years ago. Never cared for them, but they worked well for this project after I coloured them and added some fringe cut card stock for the centers. A few die cut leaves and swirls were all I needed to complete the little gift 'box'.


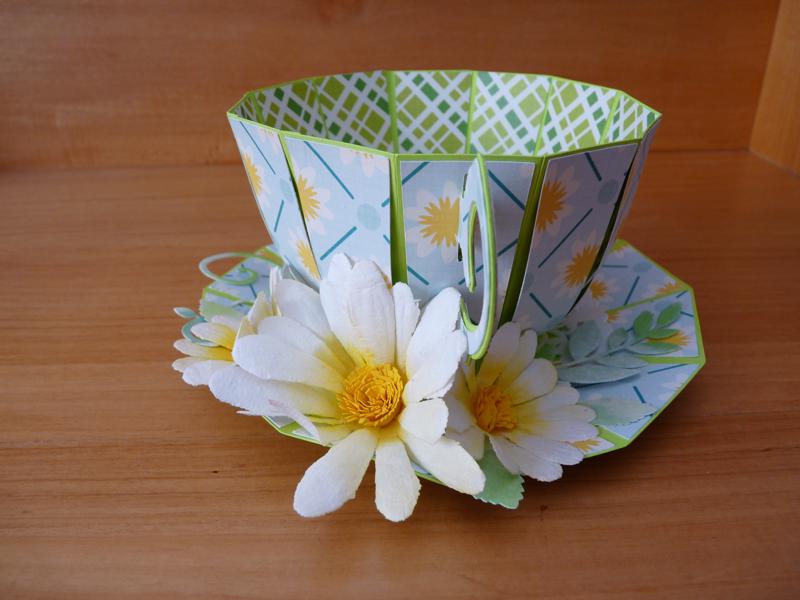
I like that the inside of the cup is also nicely finished off, so that it can be displayed empty. The papers were in a pack given me by a friend.


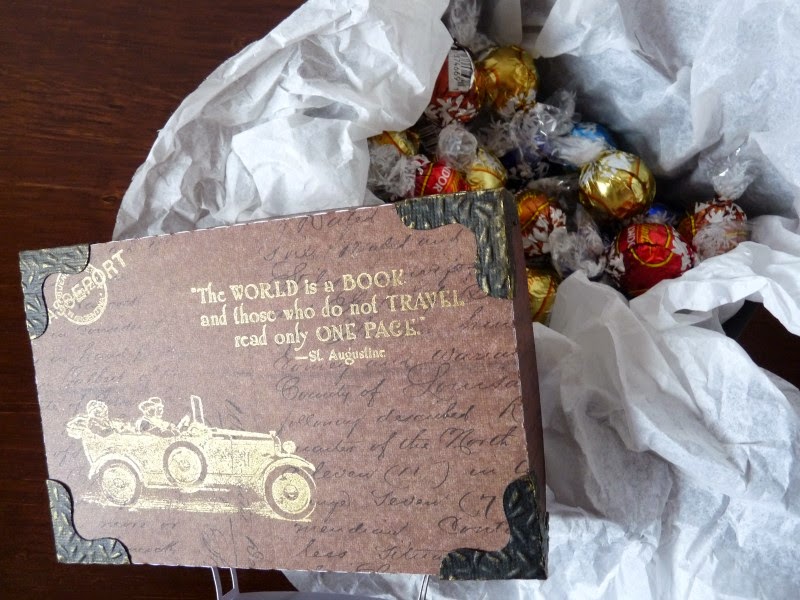
I filled a baggie with Lindt chocolate, tied it with a matching green ribbon and popped it inside white tissue paper and into the cup.


Time to add the card: I used scraps of the patterned paper and cardstock used for the cup and saucer.


I wanted the project to be bright, sunny and fresh and am very pleased with how it turned out.


The teacup is from the Tea For You and Me Collection by SVG Cuts (affiliate link)


The flowers - daisies - are from Stampendous - Cling Build a Bouquet Set


The doily details and pop up mechanism is also from Stampendous. I bought my set at Michaels.


Friday, June 9, 2017

Giant Acorn...

or cute little box?

The other day I just wanted to make something for the fun of it...now I have a tiny little gift box as a result! We had a dry sunny day, sadly so far a bit rare this spring, so I headed outside for a few bright pictures.
The papers are from a Christmas themed paper pack I picked up a few years ago from Michaels. The cardstock is from a Recollections multi-pack


The box is straight forward and easy to put together. Using patterned paper is optional, but I think lining the rounded shape with paper, even be it plain card stock, is a good idea to mimic the smoothness of the nut.


The finished size of my box is 3.5" (9cm) excluding the stem. The total length is 5" (almost 13cm)  At this size I used letter size card stock, but of course one could easily scale it up or down.


The box measures about 2.75"(7cm) in diameter across the opening


It is the perfect size for a small gift of jewelry or even just a little snack. A collection of acorns each containing a different coffee or chocolate, all piled into a bowl would make a great gift. It would also be a practical container for a hostess gift.


 I will definitely have to give that pinecone a try...


Tuesday, January 24, 2017

This is a Gloop

A Spotted Bellied Gloop to be more precise.


I got it from the 'Curiosity' Cut set over at Lettering Delights. (affiliate link) And I liked the colours so much, I stayed pretty true to them.


I've had this set for a long time, and every time I see it, it begged to be made into a 'hello' or 'hi friend' card. 

I'm glad I finally have Gloops on the desk...

Do you see the reflection on the glasses of the Gloop on the right? I put acetate behind the frames to help my Gloops see better. No pretend glasses around here, no way...


And here is that cute goofy face up close. I wonder how many different types of Gloops (or is it Gloopi?) there are...hmmm


Tuesday, January 17, 2017

Milestone Birthday

90 year young. That sure is a milestone to reach!

So what sort of card do you send a flower lover for her 90th? A box full of flowers of course!


I cut my box for the flower bunches from kraft card stock and stamped the woodgrain on using brown dye ink and a stamp by Heidi Swapp that I picked up from Michaels.

And really once that was assembled all I needed to do was decorate the different inserts and that was done with cut file flowers and punches pieces. I did add a lacy die cut to the front of the box to soften the design and to bring a bit more white in, while repeating the lace detail of the doily on the back panel.


A little organza bow finished of the tag. Besides, who gives flowers without any ribbons or bows, right? I love all the dimension these box cards have.
We added a sentiment and handwritten notes to a panel at the back of the large panel on the card.


I used :

Christmas Box Cards - SVG Cuts (affiliate link) Mary includes plain box cards for you to customize. For my card I used the Christmas Tree Box Card style.


In Bloom - Lettering Delights


Friday, September 16, 2016

Veels Geluk (Congratulations)

Time for a birthday card again. I was going to say this is for someone special, but all the cards I make are for somebody special, so that seems to be a rather pointless observation!

I used pigment inks for the watercolour look on the background. I find they blend pretty well with water, if not as readily as the dye inks. And I'm pleased with the results I got. I apply ink to the work surface, spray with water, mix it in and just press the cardstock into the mixture. The last step was splattering gold paint over the entire surface - only a little though! I just wanted a hint of gold on there. Finally I trimmed the card front a little smaller than the card base and inked the little strips on either side of the panel using the same pinkish red ink pad (ColorBox Ruby) For drying I like to put it into or underneath a book to dry nice and flat.


For the cut out I used a Silhouette Studio Design Store file by Jamie Koay called  'Roses Bunch Lace'  . The sentiment is stamped and white embossed onto black. (I think the white powder is getting old - it's looking a bit 'creamy' to me. Yikes!) and sandwiched a bit of black thread between the sentiment strip and the card. The thread is squiggly, did you notice that? I was replacing a zipper in a garment last week and thought how cute the squiggly thread look - and it ended up on the card front. Just a variation on the pristine new thread look one normally sees. I also stitched the tag to the edge of the card just to add a bit of interest.

A trio of sequins finished it up and the card is ready to be sent!


I'm off to write a little letter to mail with the card...see you soon!

Monday, February 8, 2016

Birthday Card - Boy

Even after many years of making boy cards I still find it a challenge, so I was very thankful to have the 'Leaping Lizards' cut set from Lettering Delights. I was able to make yet another card that I expect will bring a smile to a boy's face. It makes me smile anyway ;-)


The lizard came together very quickly with simple layering and just a bit of shading with pastels. I put him on a strip of kraft card, stamped with a Heidi Schwapp wood grain stamp. The card looked a bit bare so before I adhered anything on there I sprayed it with a couple of green alcohol inks.

The sentiment was written with the Silhouette Cameo and a Sharpie pen and coloured with colour pencils. I did the same for the inside of the card -


In the end I enjoyed the challenge and process of making another boy card!


The Cut Set used -  Leaping Lizards (Affiliate Link)


Tuesday, June 30, 2015

Hybrid Cards - New Baby

I have no stamps that are particularly suitable for a new baby type card, so the logical alternative for me was to go 'hybrid'. By that I mean using digital images (in this case digital scrapbooking supplies) and making a real life card from it. Besides, my old (very old) printer died recently and I wanted to try the new one for size!

I started with a digital kit by Kristin Aagard. To me,  nobody does 'cute' quite like Kristin does. I'm sorry I don't have more reason to buy/use her cute designs! (even so I have more of her goodies than I probably need...)

I used her 'Peas in a Pod'

http://the-lilypad.com/store/Digital-Scrapbook-Pea-in-a-Pod.html


I designed the card in Silhouette Studio, working on a card base from LD - Step Cards. Which worked just fine. 

The front panels for the card I designed in Photoshop which enabled me to add shadows to some elements. That meant I could reduce the bulk seeing as both cards were to be mailed internationally. For a hand delivered card, it would be much nicer to make it more dimensional!

I used the 'print and cut' feature to get the Cameo to cut the elements for me. The light wasn't good when I snapped this quickly, with the tablet, but you get the idea.


All that was left to do was to assemble the bits and pieces.


The alpha letters used for the names are also from the digi kit.


The only item actually popped up with a bit of foam tape, is the little bear on the front.


I like how it has the illusion of dimension even though it is flat for easy and safe mailing


I added a sheet of pink copy paper to the back of the cards as I did not like to look into a 'black hole' when the card is opened.


I was very pleased indeed with the results. And that printer? It is welcome to stay with me in my studio!


Friday, May 22, 2015

Gift Box... a Guy Thing

I recently made this gift box for a dear friend who was having a birthday. I had no idea what to give him...but figured chocolates seldom go to waste. But I wanted something 'nice' to put it in. I like to try and make something a man might actually like...

SVG Cuts to the rescue! YAY!


I made the little suitcase from the Summer Holiday collection, using AC cardstock and papers from Prima's 'Script' pack. The stamps are 'Come Away With Me' by Hampton Art, that co-ordinates with the Graphic 45's 'Come Away With Me Collection' (I bought the paper and stamps from Blitsy btw)


Some embossing details on the decorative panels


I should have made the handle from a double layer of cardstock, and darkened the edges...that would have been better I think.


and stuffed with chocolates. 
Yum


Over all I was pretty pleased with the result.

The SVG Collection I used - Summer Holiday 


Monday, May 11, 2015

Sheila Scarf Box


A little gift box to contain a crocheted scarf for a friend


I stamped the chipboard before assembling the box. The trim was embossed for interest and lightly inked on the edges.


Flowers and a few sprigs finished off the top. The cut files are from Lettering Delights.


I added sequins and beads to the flower centers.


And the scarf peeping out from inside the gift box.


I used the train truck cut files from 'Summer Holiday' by  SVG Cuts


And remember the latest SVG Cuts set Spring Blossoms is still available free with purchase.

  Click HERE to learn how to get 'Spring Blossoms' free with purchase.