Showing posts with label birthday cards. Show all posts

Monday, March 18, 2019

Sweet Happy Birthday

I have been so busy making stuff and doing all kinds of interesting things that I have not gotten round to posting at all. That is not good....

But today, finally an update from me, and that because I wanted to enter my card into the Cutting Edge Challenge over at Art Impressions. It is no secret that I really like AI stamps and that I enjoy taking part in their challenges!


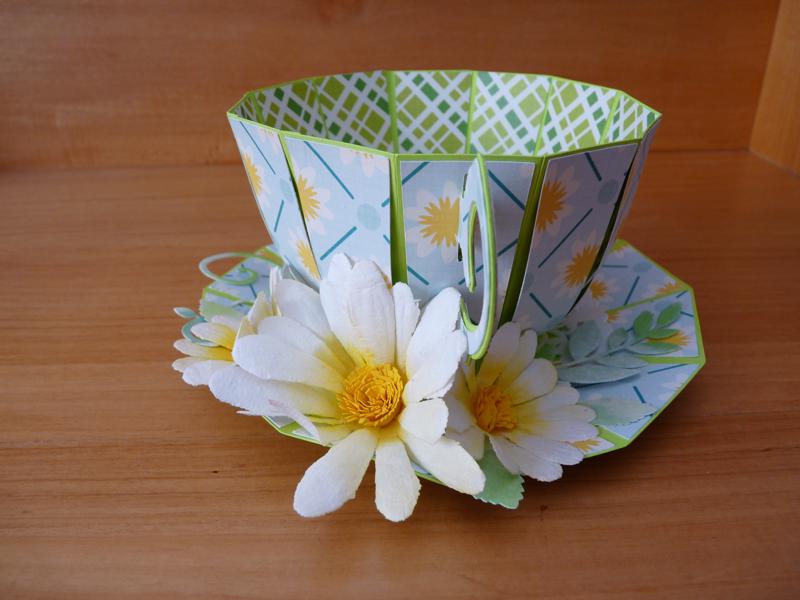
For my easel card I used the 'Tea Party Popcard' set  and I used the coordinating dies to do a partial cut over the fold of the easel. It was super easy to do.


I love all the dimension on the card! I cut out all the elements with the dies, while carefully avoiding the parts that cut the slits for the pop up mechanism. Again, that was super easy to do. I added thin foam tape and double foam tape layers to get the elements to stand away from each other nicely.


As a final touch I added the little butterfly with a piece of clear plastic so it can hover near the tulips.


Edited to add : I'm delighted to have won an 'Honourable Mention' with this card! <doing a happy dance> LOL


Here is the stamp and die set I used -Tea Party Popcard #4942 - I'm looking forward to using the pop-up die with this set....the order is on it's way!


The 'Happy Birthday' sentiment is from the 'Reel Great Guys' set  and the 'Special Treat' sentiment is from the Cupcake BFFs set


Thursday, July 26, 2018

Relax and Chill - It's your birthday!

Aaaah this little dog image is just the 'coolest' I cannot help but chuckle when I look at it.

It is simply brilliant!

I found it in Art Impressions' 'Reel Great Guys' Set (4900)

I needed a summery birthday card for a male relative and decided this dog is perfect for it. I coloured him with watercolour pencils (by Derwent) and added Liquid Embossing (by Plaid) over the entire tube to make it shiny and slightly dimensional.


The dog really needed to have a relaxing time, so I decided he might like to be floating down a little river or canal...just enjoying the ride while chilling on the tube. To get enough water for him to float on I made my card 8.5" x 4"

I cut a slit using the Silhouette Cameo and proceeded to colour the water, muddy bank and grassy edge using Distress Oxide Inks. These inks allowed me to lift colour for waves and spots for bubbles and splashes. I enhanced those with a white gel pen. I also added a bit of coloured pencil details to the bank.


The sentiment is from the 'Lake House Tryfolds' set. I stamped it onto tan cardstock, embossed it and then added a little brown ink to bring out the woodgrain from the embossing. Cutting a slit into the card front allowed me to slip the stick through to the back and 'plant' the sign in the stream.


I trust the recipient will have no doubt as to how I expect him to spend his summer birthday!

I think I should make one of these as a decoration on the wall...I know I will get a chuckle from it every time I walk past...

I'm entering my card for the Art Impressions 'Summer Vibes' Challenge

Edited to add : the card won an Honorable Mention. How fun is that?!? Thank you!


Real Great Guys


Tuesday, July 24, 2018

Floral Birthday Wishes

Time for a summery fresh floral birthday set!


This delightful teacup is by SVG Cuts. I've made several of them over the years. They make wonderful little gift or treat holders. (HERE is another example)


The flowers are by Petaloo. I had bought a pack of the white ones years ago. Never cared for them, but they worked well for this project after I coloured them and added some fringe cut card stock for the centers. A few die cut leaves and swirls were all I needed to complete the little gift 'box'.


I like that the inside of the cup is also nicely finished off, so that it can be displayed empty. The papers were in a pack given me by a friend.


I filled a baggie with Lindt chocolate, tied it with a matching green ribbon and popped it inside white tissue paper and into the cup.


Time to add the card: I used scraps of the patterned paper and cardstock used for the cup and saucer.


I wanted the project to be bright, sunny and fresh and am very pleased with how it turned out.


The teacup is from the Tea For You and Me Collection by SVG Cuts (affiliate link)


The flowers - daisies - are from Stampendous - Cling Build a Bouquet Set


The doily details and pop up mechanism is also from Stampendous. I bought my set at Michaels.


Wednesday, March 22, 2017

Floral Fresh Greetings

A little birthday greeting for a friend - another spring birthday!

This time I used the 'Summer' digital stamp from Lili of The Valley.

For this card I decided to remove the outer frame/border all together for a more 'open' look. Instead I blended some pigment inks onto the edges of the card to act as a frame.


The image was coloured using Derwent water colour pencils and colour pencils and I added a variety of die cut and punched pieces.


I used tiny flower punches and floral sequins as embellishments so as not to overwhelm the beautifully delicate sketched digital image.


For the polka dots on the dress, I mimicked the dotted designer paper using Tulip dimension fabric paint. Only do you see that squiggle on her shoulder? That was a mistake...the paint leaked out as I was getting ready to place that first dot! Yikes! I decided to leave it. It almost looks like it was intended to look like that!

All I can say is that if you're going to make a mistake, this is probably the best kind of mistake to make!


I bought the whole set of Seasons Girl digital Stamps and look forward to colouring the rest of them.

Wednesday, March 15, 2017

Spring Time Birthday

There is something very charming about a birthday in spring. Maybe because mine is when everything is very grey and very foggy, still...there is something about new flowers and birds singing that seems to make it a suitable time for a birthday.

I decided to use a Lili Of The Valley digital stamp for my 'spring feel' card. The one used for this card is called 'Spring'

I separated the frame from the image and also erased the leaves that come down from the top of the frame in the original image (see HERE) because I wanted to add a little dimension by including die cut and punched flowers. I copied the butterflies from the 'Summer' digi image (HERE) and added those around the figure.

The frame is popped up on foam tape for dimension and it also gave me a place to attach the banner greeting (best wishes)


A tiny bit of glitter on the butterfly wings and the headband finishes off the image coloured with Derwent water colour pencils and colour pencils. I also added tiny floral sequince and half pearls to the punched flowers at the top.


The easel card format allowed for the rest of the greeting to be displayed as well.

That pretty cool font used for the greetings is a free personal use font, called 'Pea Anna Banana'

I hope the card travels safely across the oceans...

Tuesday, January 17, 2017

Milestone Birthday

90 year young. That sure is a milestone to reach!

So what sort of card do you send a flower lover for her 90th? A box full of flowers of course!


I cut my box for the flower bunches from kraft card stock and stamped the woodgrain on using brown dye ink and a stamp by Heidi Swapp that I picked up from Michaels.

And really once that was assembled all I needed to do was decorate the different inserts and that was done with cut file flowers and punches pieces. I did add a lacy die cut to the front of the box to soften the design and to bring a bit more white in, while repeating the lace detail of the doily on the back panel.


A little organza bow finished of the tag. Besides, who gives flowers without any ribbons or bows, right? I love all the dimension these box cards have.
We added a sentiment and handwritten notes to a panel at the back of the large panel on the card.


I used :

Christmas Box Cards - SVG Cuts (affiliate link) Mary includes plain box cards for you to customize. For my card I used the Christmas Tree Box Card style.


In Bloom - Lettering Delights


Friday, September 16, 2016

Veels Geluk (Congratulations)

Time for a birthday card again. I was going to say this is for someone special, but all the cards I make are for somebody special, so that seems to be a rather pointless observation!

I used pigment inks for the watercolour look on the background. I find they blend pretty well with water, if not as readily as the dye inks. And I'm pleased with the results I got. I apply ink to the work surface, spray with water, mix it in and just press the cardstock into the mixture. The last step was splattering gold paint over the entire surface - only a little though! I just wanted a hint of gold on there. Finally I trimmed the card front a little smaller than the card base and inked the little strips on either side of the panel using the same pinkish red ink pad (ColorBox Ruby) For drying I like to put it into or underneath a book to dry nice and flat.


For the cut out I used a Silhouette Studio Design Store file by Jamie Koay called  'Roses Bunch Lace'  . The sentiment is stamped and white embossed onto black. (I think the white powder is getting old - it's looking a bit 'creamy' to me. Yikes!) and sandwiched a bit of black thread between the sentiment strip and the card. The thread is squiggly, did you notice that? I was replacing a zipper in a garment last week and thought how cute the squiggly thread look - and it ended up on the card front. Just a variation on the pristine new thread look one normally sees. I also stitched the tag to the edge of the card just to add a bit of interest.

A trio of sequins finished it up and the card is ready to be sent!


I'm off to write a little letter to mail with the card...see you soon!

Monday, February 8, 2016

Birthday Card - Boy

Even after many years of making boy cards I still find it a challenge, so I was very thankful to have the 'Leaping Lizards' cut set from Lettering Delights. I was able to make yet another card that I expect will bring a smile to a boy's face. It makes me smile anyway ;-)


The lizard came together very quickly with simple layering and just a bit of shading with pastels. I put him on a strip of kraft card, stamped with a Heidi Schwapp wood grain stamp. The card looked a bit bare so before I adhered anything on there I sprayed it with a couple of green alcohol inks.

The sentiment was written with the Silhouette Cameo and a Sharpie pen and coloured with colour pencils. I did the same for the inside of the card -


In the end I enjoyed the challenge and process of making another boy card!


The Cut Set used -  Leaping Lizards (Affiliate Link)


Tuesday, January 19, 2016

Flying Away - Birthday Card

A birthday card in warm colours, send with warm wishes!

I started with the brown cat. And then added the warm colours on the balloons...and decided to keep the rest all in the yellows through reds. I'm so pleased with how this one turned out!


A simple greeting inside leaves room for a personal note...


 A little detail there of the paper ribbon.


I popped the tag up with foam tape and I like the dimension it gives to the card.


The cat stamp is from Penny Black - Bubbly


The sentiment is from Stampendous - Happy Messages


and the balloons are from an old Provo Crafts set.

Have a happy week creating!

Thursday, October 22, 2015

Adorable Squirrel Nut House

I was simply delighted to win the Pink & Main 'Nut House' Stamp and die set through a Facebook draw recently. Aren't those squirrels just the cutest? We have some pretty adorable squirrels who visit us all year long so I'm rather fond of these furry creatures.

Isn't this piece of very happy mail pure inspiration? (even the padded envelope is pink ;-) )


Here's a nice clear image of the stamp set (image linked)


Naturally I had to play with my new goodies straight away. I decided to make  birthday card for a young friend. And then I could also enter it into the Pink & Main October Challenge - Theme Birthday.

I cut the little house (using the dies) twice from brown card stock and added paper pieced details and coloured pencil for shading.
The leaves I die cut from different colours of card stock adding coloured pencil and a bit of glitters (this is for a girl after all!) for added interest.

The squirrel was die cut from white card stock and also coloured with coloured pencils. I gave her a pink nose...girls understand about pink noses!


On the inside I stamped and white embossed a simple birthday greeting (using and older Provo Craft stamp) and then adhered the very top of the two house pieces together. This way the card stands up nicely for display.


I was super pleased with the quality of the stamps and dies. The images stamp beautifully crisp with nice thin lines. Do check out the Pink & Main Store and the new releases full of adorable seasonal images. The Nut House is part of a series of houses btw...what a totally cool idea.

Take a look at these new ones -images are linked- and of course with the dies, they are a breeze to 'cut'!


Hop on over to the blog and check out the Challenge!


I'm also submitting this to :

the Rubber Dance October Challenge (theme is Autumn' and the colours are all perfect for fall)

the Your Next Stamp Colour Challenge