Wednesday, November 30, 2016

Christmas Card - More Poinsettias

I had to make at least one more Christmas card this year featuring poinsettias. This was such a satisfying card to make!

I used a wide selection of cut files, dies, punches, embossing folders and patterned paper.


To make it an easy to display card, I turned it into an easel. I figure a Christmas card might as well become a decor item!


An online search for Christmas sentiments brought this one up, and I used the Silhouette pen feature and a gel pen to write it out for me. The holly border punch is by Friskars.


I'm pleased with how it turned out and since it will be hand delivered, the size - 6" square - as well as the dimension with all those bits and bobs makes no difference.


Wednesday, November 23, 2016

Christmas Cards - Oldies and Goodies

I have had these clear stamps for so many years, I've lost count. And I still like using them. The clean, simple and graphic design means they are timeless. The stamps, made by ProvoCraft, also work really well for tags.

The cards were really quick to put together - I layered patterned paper and a piece of embossed card stock onto the card front. After colouring the images with coloured pencil, I fussy cut them and adhered them to the front with thin foam for a bit of dimension.


The stocking also got a simple knotted ribbon and sequins.


 I joined the mittens by looping a length of twine between them, added some sequins and a basic sentiment on a strip of cardstock finished off both cards.


I really like all the colour, texture and dimension on these very simple and quick cards!


Do you have 'oldies-but-goodies' stamps that can take another turn at center stage on your projects this year?

Wednesday, November 16, 2016

Christmas Cards - Comfort & Joy

I enjoy working with paper, I mean I really really really enjoy working with paper...

That is why this card was so rewarding to make. I envisioned it in pure white, with a bit of cream, but it kept begging me for colour. I relented a little, finally adding some red and a hint of gold. And called it done. I am very pleased with how this turned out!


I used cut files for the Silhouette Cameo for the main elements - The poinsettias are from 'Christmas Box Cards' by SVG Cuts (affiliate link) The greenery is from 3 D Wintergreens also by SVG Cuts (affiliate link) The holly and pine cones are by Sherri McCulley  I also used an embossing folder " Piroutte" by Anna Griffin for Cuttlebug on the background. I used a snowflake die as a lacy layering elements and a Fiskars punch for the holly detail on the raised element that keeps the upright portion of the easel card in place. The lettering was done using the Cameo and a gold gel pen.


And just because my eyes very asking for colour...I made a second card, similar to this, but in colour. I used mostly dye inks for colouring the different elements.


Love all the details in the flowers and the water coloured look that the dye inks give.


I used a combination of Thin Fonts (at Lettering Delights) and regular fonts for the sentiment.


 I added a thin strip of gold embossing to the edge of the raised piece to tie the upright piece in with the bottom area where the message can be written. I also gold embossed the flourishes


I wonder how many of these I would have to make before I've 'had enough of it'...


Wednesday, November 9, 2016

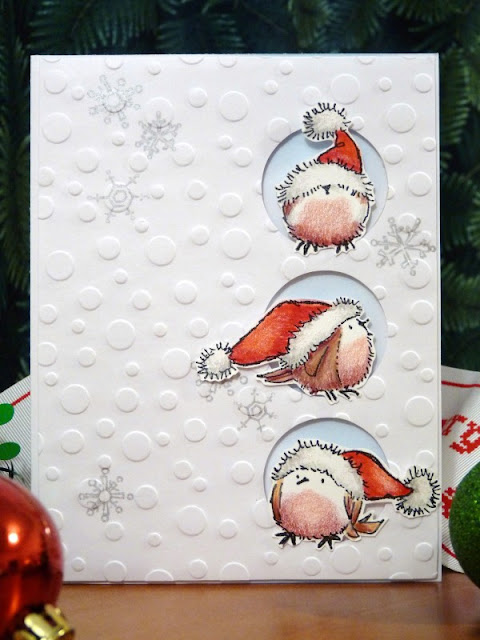
Merry Christmas - Robin's Wishes

For the second Christmas card for this year, I kept the same layout format as the one for that Mischievous Cat card.


I used the Silhouette Cameo to cut the circles and draw a few snowflakes using a doodlebat font and a silver pen. This time I used the 'Random Dots' embossing folder by Echo Park. I thought the randomly spaced and sized dots mimic snow nicely.
I added a little ink blending to the areas directly behind the birds on the A2 cardbase and mounted the panel with foam to the card front. The birds were also attached with foam so I could perch them in the holes. I like the dimension this gives while still ending up with a flat card that is sturdy and easy to mail. All the images were coloured using coloured pencils and I added a little bit of glitter to the birds' hats for festive cheer.


For the inside I used a 'basic' sentiment and image. This cat looks so very pleased with itself. I coloured it to look like the cat in the house this is going to...
A strip of washi tape finishes the bottom of the card off nicely and carries on the theme of 'presents' while a bit of glitter on the sentiment's heart shape adds sparkle.


The images and sentiment are from the Penny Black 'Winter Wonderland' set.


I have used this set many times over, with a few projects showcased here on the blog. The images are also very good for decorating writing paper. I would like to try using the birds to make fabric too. But that may have to wait for another year!
So many ideas, so little time!

Wednesday, November 2, 2016

Merry Christmas - Mischievous Cat


For once I thought I would start my Christmas cards when I'm inspired and not wait until closer to Christmas. So this year I had several done by the end of October. I'll be posting these once a week for the month of November.

First up - this mischievous cat, after some thought, had a great idea...


I cut the circles from white cardstock and used the 'Polka Dots' embossing folder by Cuttlebug to give it the delightful texture. I did some basic colouring on the stamped images using coloured pencils. Then I mounted the panel on the front of an A2 cardbase with foam for added dimension.

The cat images are from 'Nine Lives' by Penny Black.   I enjoy using this set for all kinds of cards and for decorating writing paper. The expressions are priceless!


And this is what that cat got up to...as to be expected, right?


I used strips of washi tape to decorate the top and bottom of the inside of the card. All the colouring was done with coloured pencils.

The Christmas tree is from the Penny Black 'Holly-Jolly' set


I used this set for another card I made last year : -  'Critter Christmas'

Wednesday, October 26, 2016

Winter Snow Fun

This stamp set -  Winter Wonderland by Penny Black - just begged to be made into a slider card!


I coloured the images with coloured pencils and trimmed the little hedgehog out with scissors. The embossed snowflakes were done with the 'old style' Fiskars embossing plates. I find these very useful for adding selective embossing, exactly where I want them to be. I also drew in more snowflakes to match the flakes in the stamp to complete the image.


I cut the slot for the slider with the Silhouette Cameo. As a weight I used a dime. I like that it is smaller and thinner than a penny. I trimmed the foam to fit the slider nicely - snug enough to add support to the cardstock but wide enough to allow the dime to slide easily. I attached the coin to the little hedgehog image with foam tape. 


The little hedgehog now slides and sometime swirls down the slope. Every time it goes down the bank it ends up differently at the bottom. Which I think is pretty true to life. I must be a big kid but I have sent the little fella down many many times...hehe


On the inside is a bunny friend who ended tummy first in the snow... leaving lots of space for a message...or even a short winter poem!


I added little spots of glitter glue snowflakes on the outside and inside of the card .


The card turned out to be most enjoyable to make...and the critters are very cute indeed. I hope the little ones this card is intended for, will enjoy watching them have a little snow fun.


Last year I used the robins from this stamp set to make decorations for the tree - Tree Decor Wood Slices


Let the snow fun begin!


Wednesday, October 19, 2016

3 D Snowflake - Totally Regal

I started crocheting a collection of 12 3D snowflakes back in January of 2015. My plan was to make one snowflake a month finishing up the collection in December. All went well with the plan, till the end of May. At that point there was just too much else happening in my life and I was not able to keep it up. Family concerns were more important and I took time to adjust priorities.

It's with pleasure that I returned to my 3D snowflakes this week! I'm using patterns from this book - Dimensional Snowflakes - that I bought from Annie's Craft Store


So here is the 6th snowflake in the collection : "Totally Regal"


The dimension is more visible here -


I perch the flake onto wooden blocks when gluing the 3 pieces together. I find it much more convenient than trying to hold it in my hand. Here is the first snowflake's post, showing how I starch and shape these beauties.


It's good to get back on track with these and I hope I can wrap this collection up this season. I was thinking how pretty the parts of these flakes will be for making 'flat' flakes too. hmmm...

Now I need to find more or larger storage for my collection, as the current holder is full. What a delightful 'problem' to have!

Happy autumn to all of you!